the following suggestions. Props would be nice however.
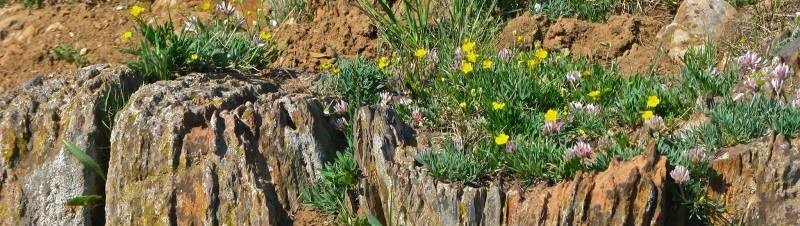
Rubber Boots and hat – Needed in the Pacific and as the day progressed we had a hailstorm strong enough to punish the ears. High boots are always a good idea esp . If you end up going into rattlesnake country. My own suggestion includes using rawhide dangles. Sturdy steel tipped hiking boots when the weather is dry. Supposedly Turpentine spritzed onto the boots or leg area also deters them.
After dropping one of my chisels I had a heck of a time locating it so I suggest that you paint your tools or dip the handles in a bright rubber like compound. Obviously the business end of hammers or chisels will get eaten up but some residue will remain. Treat the tools with oil or wD-40 when you get home. I stress this painting as near all these rusty, old steel tools are damn hard to find if you lay them down. More on what to carry with you is at the bottom of the page but it includes the suggestion of wearing something BRIGHT!. Considering the shotgun and rifle shells we found, it is always wise to to wear something bright. Bullets can travel up to a mile! Be site conscious if you hear rifle fire. Wearing something bright, not dark will also make your body easier to find if you collapse or get injured.
This brings me to an essential that I always carry in my car. First Aid Kit – bandages, good tape and Peroxide are a must. I probably would add duct tape, a whistle and some matches to that package. Now none of this will help if you get hit by a big rock or a sledgehammer – so stay away from IDIOTS! On the last outing I happened to get cut by some flying basalt chips. Wearing a bright vest and a hard hat did not protect me.

Using big sledgehammers to break out delicate one inch is not the preferred way of doing things and I noted that the two best items were uncovered by the ladies who used appropriate tools. Pick hammer and chisels are available at most shops of from suppliers such as KingsleyNorth.
In a serious outfitting a good external frame backpack is very useful. One of the most clever packing ideas included a back frame, Kelty or military, to which a bucket is attached with bungee cords. Plastic collecting Buckets should always be used – not plastic bags. I would think using one of those canvas garden wrap arounds would be a great accessory idea, instead of having all those tools slip and slide. BTW the link above shows how to make one out of PVC pipe.
Not mentioned in the list below, but it is always better to go with a partner or two. Simple common sense. Bigger or younger is better – as they have a better chance in carrying you out! One car should carry a jumper cable and hopefully someone has a cellphone. And always tell people where you are going. I should also add that one should NEVER volunteer to ride in the back of the truck while the temperature is in the thirties and common courtesy requires shared rides. Sadly that was not the case during this adventure. I feel that the Sequim group came out with high grades in the matter of sharing and simple courtesy.
Finally – Know your limitations! If you have to stop 8 times going up a hill you used to mountain goat up or if you start looking for a napping spot its time to find a new hobby.
I keep the following tools in a bucket in my trunk… It includes some of these items.
The colored line item are essentials – I generally only bring the “heavy weapons” if I know I’m going to need them, otherwise it’s a heavy weight to take around and one after look the Jiffy Lube guys refused to vacuum and clean. I find the geological hammer not much use for normal mineral collecting. It’s ok if you’re going to somewhere with soft rock – but I prefer a club hammer and chisel for most things.
*Shorthandle sledgehammer
* Gorilla” bar
* Chisels
- Hand chisels, wide-ended or pointed: Another basic tool, and you should have a good-quality set of them. Carbide-tipped ones will make your work easier, although they are quite expensive. and if you see any of these at a garage sale, don’t haggle just BUY! I tend to paint them with an orange spray so they can be seen if dropped. And yes, the paint will rip off when used, but the sides will still have some remaining. This goes for the handles of most of my tools. .Star chisels can also prove useful.
Club hammer
Geologist’s pick (hammer/pick): A standard tool used for prying (not hitting rocks unless you want only a small chip) and as a handy guide to scale in photographs! Some manufacturers, such as Estwing, also offer geologist’s hammer/chisels, as well as belt sheaths for both tools. The neck of the hammer can be painted or rubberized with a bright goop.
Crack hammer (2, 3, or 4 lb): This is for breaking medium-sized rocks and for driving your chisels. Go with the largest hammer you can comfortably handle.
Crowbar or pry bar: A basic tool every rock- hound should have. 22″ pry bars are good basic tools, although 30″ and larger are needed for really heavy work.
Other tools: Hoe pick, bricklayer’s (splitting) hammer, shovel, trowel.
* wrapping materials (aluminum foil works fine) small zip-lock style plastic bags are a very handy addition
Newspaper or other wrapping paper: Dumping all your specimens in together is a good way to damage them. Wrap each separately to protect them. Don’t use newspaper for fluorescent specimens unless you wrap them in plastic first, as fluorescent dyes can sometimes rub off on your prizes.
Collecting bags: Used with wrapping paper to protect fragile crystal groups.
* Canvas bags or plastic carrying bucket
Sun hat: If a hard hat is not needed, protecting your eyes and skin from the sun is still a good idea.
Sturdy walking shoes: Collecting areas generally have rough footing. Ankle support, lug soles, and steel toes are recommended.Safty goggles! - Hard hat: This is a necessity on any rockhounding trip where overhanging or falling rocks are a possibility.
* yellow/orange florescent safety jacket or vest.
* steel-capped boots
Drinking water, lunch, first aid kit, snake bite kit, sunscreen, etc.
* water and matches - On a major outing I would include:
A good shoulder field bag or internal-frame backpack: will make your life easier. (Some rockhounds use a large-wheeled handcart or the like when collecting in areas where the terrain is not too rough.) One fellow used an old external frame to which he bungeed a plastic five gallon container too. I was most impressed.
Polarized sunglasses: These will both protect your eyes from bright sunlight and help you identify specimens by blocking glare.
(C) Herb Senft 2013